Showing posts with label game of thrones. Show all posts

Sunday, May 4, 2014

Olenna Tyrell Hot Toddy

Good ol' Olenna Tyrell and her crafty, clever ways. She definitely reminds us of a southern woman
with her fierce love of family accompanied by a ruthless streak. This is one woman who isn't afraid to get her hands dirty to get done what needs to be done.

And since we hated that little twirp Joffrey, we're glad this tough cookie is in King's Landing!

So for tonight's episode, we'll be raising a glass (well, we older gals anyhow) to Olenna Tyrell and sipping on hot toddies.

Here's to Olenna Tyrell! The matriarch we love the most in Westeros.


Olenna Tyrell's Hot Toddy Recipe: 

- 1.5 oz rum
- 1 Tbsp honey
- 1 c hot water
- 1 bag of black tea
- a dash of lemon


Friday, April 11, 2014

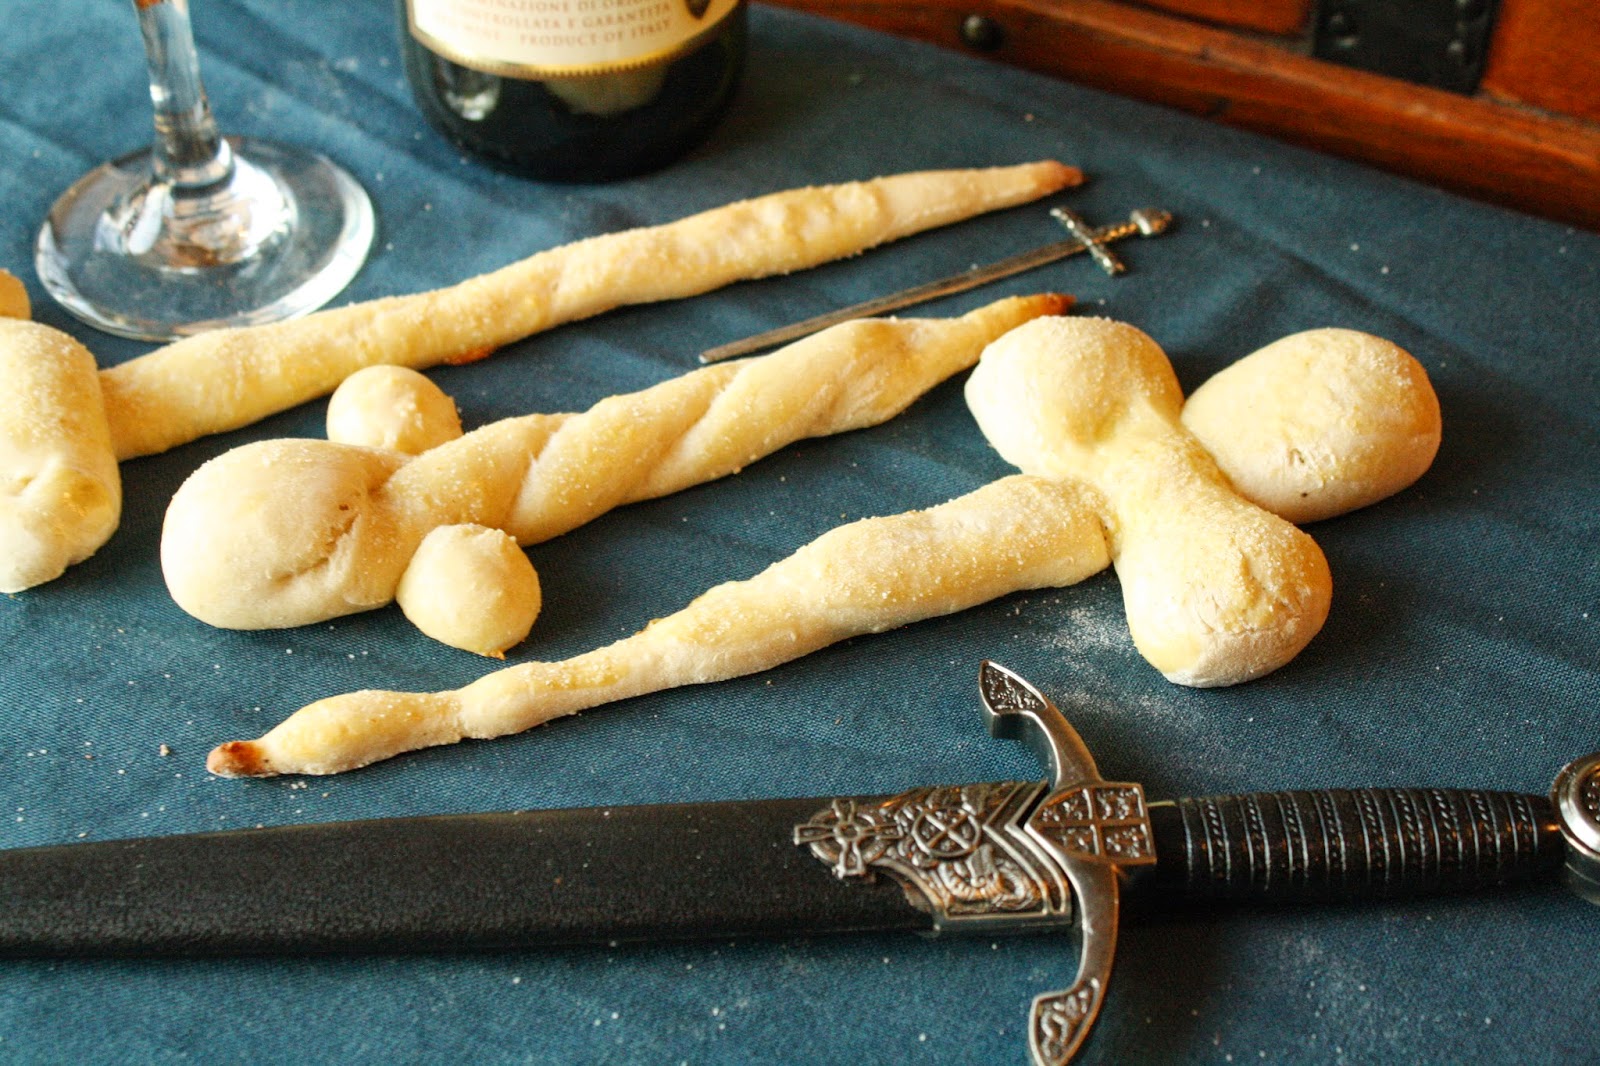
Pretzswords: Soft Pretzel Swords

Soft Pretzel Swords for Your Food Arsenal


Everyone needs a few armaments round the table. So why not make them delicious as well? The characters of Westeros seem to always be heavily armed - even at dinner. Here at House Cook, our arsenal is equipped a little differently. Sure, we have a couple of broad swords lying around, but when it comes to food our swords are completely edible.

If you love soft pretzels, then follow our recipe and shape them into pointed swords and knives that will make you ready for battle...or maybe just snack time. Whether you're fighting or eating, we recommend you always have a pretzel on your side.
Prep time: 30 minutes
Bake time: 10 minutes
Makes 8-12 Pretzels (less or more depending on how big you make them)

Ingredients:

1 1/2 cups lukewarm water
1 packet active instant yeast, or 2 1/4 tsp
1 tsp salt
1 Tbsp sugar
3 3/4 - 4 1/4 cups flour
1 egg
Salt for flavor

Step 1: Preheat the oven to 425 degrees and prepare a baking sheet with parchment paper.

Step 2: Dissolve the yeast in the lukewarm water. Stir gently with a spoon for about one minute until mixed. Add salt and sugar and stir until thoroughly combined. One cup at a time, add in three cups of flour. Mix with a wooden spoon while you add until the dough is thick. Add flour a quarter cup at a time until it is no longer sticky. 

Step 3: Flour a flat surface. Place the dough on top and knead if for about three minutes. Shape into a ball. Separate the dough into sections for the pretzels. You can make each pretzel as big or small as you want.

Step 4: To shape the swords, we used two different techniques. The first is to roll the dough into a long rope. Fold the rope in half and twist it together. Shape the end into a point and add two clumps of dough at the thicker end for the hilt of your sword. The other technique is to roll the dough into a long rope. Flatten the rope and then pinch it together with two finger. Pull one end into a point. Now take a smaller piece of dough and make a hilt that is large at the ends and thin in the middle. Lay the hilt over the top of the sword. Place each sword on the parchment paper when it is complete.

Step 5: Beat the egg into a small bowl. With a brush or your fingertips, spread egg over the top of you pretzels. Sprinkle with salt. (I like to use garlic salt on my pretzels). Place pretzels in the oven for ten minutes or until the bottom is golden brown.

And that's it! An easy and quick pretzel recipe with a Game of Thrones twist. We hope enjoy this great treat for a regular snack or a Game of Thrones viewing party.


Monday, March 31, 2014

The Dirt and Mud of Westeros


Dirt: The Pudding and Oreos Treat to Roll Around In


As we gear up for the new season of Game of Thrones - which we couldn't be more excited for - we've noticed that the men and women of Westeros seem to really love mud! They're always rolling around in it until they're completely covered. We decided to jump in on this mud craze and see what all the fuss is about.

Of course, we couldn't just use regular dirt. We whipped up this delicious dessert and played in it instead. Let's just say that we all enjoyed eating it, but we're not sure any of us liked playing in it. There must be a trick in Westeros we're not aware of here...


Prep time: 30 minutes
Total time: 3 hours
Makes between 15 and 20 servings

Ingredients:

1 package of Oreo cookies
2 packages of instant chocolate pudding (3.9 ounces total)
4 cups milk
8 ounces cream cheese - room temperature
1/4 cup butter - room temperature
1 cup powdered sugar
8 ounces whipped cream
Gummy worms (we used sour ones. yum!)

Step 1: Crush the Oreos. This is easiest done in a food processor; however, we didn't have one on hand. If you're like us, put the cookies in a plastic bag and crush them using a rolling pin.

Step 2: In a large bowl, whisk together milk and pudding mix for two minutes, or until it thickens. Let stand for about 5 minutes.

Step 3: While the pudding is waiting, beat together the cream cheese and butter in a medium-sized bowl. On low speed, add in the powdered sugar slowly. Beat until it is thoroughly mixed and nice and fluffy.

Step 4: Fold the cream cheese, butter, and sugar mixture into the pudding. Then fold in whip cream until it's thoroughly combined.

Step 5: To serve we used small cups, though you could put the whole thing in a large pan. Either way, layer the mixture with alternating layers of Oreos and pudding, starting and ending with Oreos. Refrigerate for a couple of hours and then serve.

We hope you enjoy your dirt! Though, despite how fun it looks on Game of Thrones, we wouldn't recommend playing in it. It's kind of cold...and sticky...


Friday, August 9, 2013

The Long Summer Caprese Bites

Tomato, Mozzarella, and Fresh Basil Bites with Balsalmic Vinegar

The Long Summer is finally drawing to a close, and that means that winter is coming. Hear at Cook's Landing, the long lunch seems to be winding up as well. And we all know what that means, dinner is coming. We're about to enter fall, or what we like to call "that awkward phase before dinner when you fill up on appetizers". 

So today we bring you Caprese Bites - the perfect, light appetizer for your pre-dinner treat.

You'll need:

Fresh basil leaves
Cherry tomatoes
Mozzarella cheese
Salt
Pepper
Balsamic vinegar
Toothpicks

Step 1: Cut the cheese into cubes. Put one cherry tomato, half a basil leaf, and one cube of cheese on each toothpick. I like to heat mine up in the oven so the cheese is warm. If you like it warm, preheat the oven to broil and place your bites on a pan. Let them sit in the oven for no longer than 1 minute so the cheese isn't too melted. 

Step 2: Sprinkle salt and pepper over your bites and then drizzle balsamic vinegar on top. I like to keep extra vinegar in a bowl with salt and pepper in it to dip the bites in.

And that's the whole process. An easy and delicious appetizer that anyone can make. Enjoy!


Tuesday, August 6, 2013

Kingsroad Peanut Butter Bars


Reese's Dark Chocolate Peanut Butter Cup Bars

We love Reese's. Naturally, while we watched Jamie Lannister slog through the mud of Kingsroad this past season, we thought: Reese's! So today we've whipped up a batch of Reese's Peanut Butter Cup Bars that are an easy treat for a hot day. And as dark chocolate fans, naturally we used ark chocolate chips. 

So today, when you're traveling down the Kingsroad in the heat, sit back and relax for a minute while you enjoy this simple dessert.

Prep time: 15 minutes
Fridge time: 2 hours
Makes: 9x13 pan

Ingredients:

1 1/2 c peanut butter
1 1/2 c powdered sugar
2/3 c crushed graham crackers
2 Tbsp butter

4 cups dark chocolate chips
4 Tsbp shortening

Step 1: Mix together peanut butter, sugar, graham crackers, and butter. Spread across the bottom of an ungreased 9x13 inch pan. 

Step 2: In a double boiler, melt chocolate chips and shortening together. Pour evenly over the peanut butter mix. Place in the refrigerator for 2 hours or until top is solid.

And that's it! Super simple and delicious. Cut it into bars and enjoy!


Thursday, July 11, 2013

King in the North "Game of Thrones" Mug

Recently, while browsing the pages of Etsy for weird, fun, and awesome handmade "Game of Thrones" things, I stumbled across a mug I really liked. A funny fact about we sisters of House Cook is that we seem to practically collect mugs. Maybe it's all of the tea and coffee we drink, or maybe it's because hot chocolate is the bestest, or possibly it's because the Disney store has so many cute ones available--who knows.

Arya Stark illustrated mug by sketch123


As soon as I saw this mug, I was smitten. The cup isn't anything out of the ordinary, just a normal coffee mug with a standard shape, but it's adorned with a pair of excellent illustrations featuring Arya Stark and Robb Stark, the King in the North.

King in the North "Game of Thrones" mug by sketch123

The illustrations are so fun! I love the blood splatters and the addition of the dire wolves. Perfect for any children of House Stark.

The Etsy seller, Christine of sketch123, has several other fun "Game of Thrones" inspired illustrations and products. I enjoy her take on the characters and the clever way they're presented.

We've been finding a lot of fun "Game of Thrones" themed things lately. Maybe it's because we're looking for them... but I like to think that they are finding us (haha, no I don't! That's nonsense. The Google has been a big help). Since there are so many cool things out there we'll be showing you more as time goes by!

Got a fun fantasy or "Game of Thrones" product, artwork, or craft you think we'd like? Drop us a line through our Facebook Page. 

Friday, June 7, 2013

The Kingslayer: A Whiskey Drink


This Sunday marks the finale of 'Game of Thrones' season three. It's almost hard to believe that last week's startling episode 'The Rains of Castamere' wasn't the cliff-hanger ending simply because of how shocking it was. What more could happen?! We're not sure we're ready to find out! To help steel our nerves, we're going to need a little more than a tasty wine smoothie or delicious limeade to sooth us. This week, we turn to a character for inspiration who is at once likable and loathsome, but most of all incredibly interesting: Jaime Lannister, the Kingslayer.

On the one hand, the drink we've prepared is somewhat sweet, but is ever willing to stab you in the back and has a bite to it to watch out for. Perfect and refreshing for enjoying with friends 

Kingslayer Drink Recipe: 

Mix 1/2 oz sour mix, 2 oz cranberry juice, and 2 oz Jameson Whiskey. Pour over ice.


Thursday, June 6, 2013

Red Wedding Bruschetta

A 'Game of Thrones' Inspired Treat to Die For


In honor of the Red Wedding, we thought we'd fix an appetizer! (It's easier to remain calm during a blood bath if all you can think of is what you're going to snack on to feel better) Naturally, we thought of piles of tomato topped with cheese and fresh basil. So while you watch the season finale of Game of Thrones this week, munch on this delicious bruschetta with a spicy kick.

Prep time: 15 minutes
Bake time: 7 minutes
Makes 15-20 pieces

Ingredients:

6 Roma tomatoes
Fresh basil leaves
1 Baguette 
3 Cloves of garlic
¼ Cup extra virgin olive oil
2 Tbsp balsamic vinegar
¾ tsp ground red pepper
½ tsp onion powder
1½ tsp salt
1 tsp Italian seasoning 
2 Cups shredded mozzarella cheese


Step 1: Chop tomatoes and put in a medium sized mixing bowl. Mince garlic and add it to the bowl. Add in olive oil, balsamic vinegar, red pepper, onion powder, salt, and Italian seasoning. Stir until thoroughly mixed and let sit. Make sure to do this first so that the mixture has time to marinade.

Step 2: Set oven to broil. Slice the baguette into three-quarter inch slices and set on a baking sheet. Place in the oven for roughly two minutes or until the top of the bread pieces is light brown. Remove from oven.

Step 3: Evenly spoon the tomato mixture onto the bread pieces. Sprinkle mozzarella cheese over each piece. Put back in the oven for 3-5 minutes, or until the cheese has melted.

Step 4: Chop fresh basil leaves and place them on top of the melted cheese. Serve immediately.


And that's it! Pretty simple for a tasty snack, appetizer, or healthy meal. If you have leftovers, pour them over lettuce for salad. 


Monday, May 27, 2013

Baratheon Bread: Lemon and Poppy Seed Bread


With the gold and black colors of the House Baratheon of Westeros in mind (and Stannis' rather sour personality), today we're bringing you our own Baratheon Bread! This delicious lemon and poppy seed bread is both sweet and tangy. It's light quality makes it a perfect snack, breakfast, or dessert! It's versatile like that.


Lemon and Poppyseed Bread Recipe

Prep time: 10 minutes, bake time: 50-55 minutes
Serves: 10-12
Difficulty: Easy

Bread Ingredients


11/2 cups of flour
1 tsp baking powder
1/2 tsp of salt
2/3 cup evaporated milk
2 large eggs
1 cup of sugar
1/3 cup of olive oil
2 tsp of lemon zest (grated lemon peal)
1 tbsp of poppy seeds

Lemon Syrup Ingredients

1/3 cup sugar
1/4 cup lemon juice


Step 1: Preheat the oven to 350Âş

Step 2: Mix sugar, flour, baking powder, and salt together in large bowl.

Step 3: Place the eggs, olive oil, evaporated milk, and lemon zest in a bowl and beat until thoroughly mixed.

Step 4: Pour the mixture from Step 3 over the flour mixture and stir until thoroughly mixed. Once mixed, fold in the tablespoon of poppy seeds and stir until fully mixed in.

Step 5: Pour the batter into a greased 4 x 8 and bake for 50-55 minutes.

Step 6: While the bread is baking, combine the lemon juice and sugar for the lemon syrup in a saucepan and cook over a medium to low heat until the sugar has fully disolved and has turned to a light syrup.

Step 7: Once the bread has finished, check to make certain it is baked through by poking a long wooden toothpick into it to see if it comes out clean or gooey. If it comes out gooey, give it a few more minutes to finish baking. If it comes out clean, poke lots of holes throughout the top of the bread and slowly pour the lemon syrup over it.

Step 8: Allow about 10 minutes to cool in the pan, then remove and allow another 10 minutes on a plate. Once it's cool, simply slice and enjoy!


Monday, May 20, 2013

Yellow Rose of Tyrell Cake


Oh happy day! A wedding! Well, actually, several weddings! As this third season of Game of Thrones winds down, many of our favorite Westeros lords and ladies are getting married--whether they're happy about it or not. We're hoping it all turns out happily, but this is Westeros, so that just doesn't seem likely. 

For us, a happy wedding means good cake. For a Tyrell, a good cake means roses that are growing strong. We've whipped up this rose covered cake to celebrate the upcoming big day for Margaery Tyrell. And did we mention the hazelnut? The cake, icing, and Nutella filling are all hazelnut flavored, making for a delicious treat. 

Today we're giving you the cake recipe, but look out for our rose tutorial coming later this week where we'll teach you this very easy technique to create a beautiful Tyrell Rose Cake of your own.


 Yellow Rose of Tyrell Cake Recipe

Prep time: 30 minutes, bake time 25-30 minutes, icing 30 minutes
Difficulty: Moderate
Serves: 12-15 

Cake Ingredients:
  • 3 cups flour
  • 1 tbsp baking powder
  • ½ tsp salt
  • 1 cup unsalted butter (if you use salted butter then don’t use the ½ tsp of salt)
  • 1 ¾ granulated sugar
  • 4 large eggs
  • 2 tsp hazelnut extract
  • 1 cup room temperature milk
Buttercream Icing Ingredients:
  • 2lb bag of powdered sugar
  • 1 cup shortening
  • ½ cup milk
  • 2 ½ tsp hazelnut extract
  • Yellow and green food coloring
*You will also need Nutella for the cake filling 

Hazelnut Cake Recipe:


Step 1: Preheat oven to 350 degrees. Grease two 9 inch cake pans or three 6 inch pans. 


Step 2: Sift together flour, baking powder, and salt in a medium sized bowl

Step 3: In a large bowl beat butter until creamy 

Step 4: Gradually add sugar and beat thoroughly

Step 5: Add eggs one at a time, beating thoroughly before adding the next egg

Step 6: Beat in hazelnut

Step 7: Add flour slowly, adding milk as you add flour in order to help the mixture beat more easily

Step 8: Pour mixture into pans and bake for 25-30 minutes or until finished. Bake time will vary depending on size of pan you used.


Crusting Buttercream Icing Recipe:

Step 1: Beat together shortening and hazelnut extract until creamy in a large bowl.

Step 2: Slowly add powdered sugar. You will need to add no more than a cup at a time and beat the mixture thoroughly before adding more. As the icing becomes harder to beat, slowly add milk. Only add a little at a time until all sugar and milk is added and icing is smooth.

Step 3: Separate about a quarter cup of icing from the mixture. 

Step 4: Mix green food coloring into the small portion of icing

Step 5: Mix several drops of yellow food coloring into the larger portion of icing

How to Decorate the Cake:

Cake Layers:

Step 1: Place the first layer on your cake plate. It’s easiest to place the cake upside-down so that the flattest part of the cake is facing up.

Step 2: Add some yellow icing to piping bag with a round icing tip. Put a rim of icing around the top of the cake layer. Then fill in the rim with Nutella. Place the second layer on top of the first. If you are using three 6 inch pans, then repeat this process and add the third layer.

Crumb Coat:

Step 1: To crumb coat the cake, add a thin layer of yellow icing to the cake. You only want to add enough icing to hold in the crumbs and to give the roses something to stick to.


How do you make the roses? See our tutorial here: 


Friday, May 17, 2013

Toasting the Hand of the Kitchen with a Red Wine Smoothie


Just as every king needs his castle and his Hand of the King to manage his affairs, so the kitchen of House Cook needs a sous chef--or, in our case, Hand of the Kitchen--to do most of the actual baking.

House Cook is, sadly, divided between two estates. One is where most of the sisters live in Georgia, and the other is where the oldest, Sarah-Lambert, lives in Texas. Most of our cooking is done in Georgia by the sisters there, but every Friday we will be introducing a new drink--some alcoholic, some not--from the kitchen of Sarah-Lambert.

Today, we toast the introduction of the Hand of the Kitchen, Katy-Lynn. You'll be able to spot who the Hand is at all times in our pictures because she'll be wearing her Hand of the Kitchen spoon brooch:


And now (drum roll, please)... meet the Hand of the Kitchen:


What should we toast her with, you ask? How about a delicious red wine smoothie! Yuuuuummy! 

This is an absolutely delicious drink. Perfect for the hot weather, but not out of place when the cool seasons return, this red wine smoothie is fabulous. Here's how to make your own: 

1 1/2 c red wine 
1/2 c frozen blueberries
1/2 c frozen raspberries
1/2 c frozen blackberries 
1 c Greek yogurt
1 tsp sugar *

Blend it all together and voilá, you have your smoothie! 
 Perfect with smoked Gouda cheese. I also enjoyed some Muenster cheese with mine. 

*I prefer mine a little more bitter, so 1 tsp of sugar is fine for me, but if you prefer sweeter simply add a tablespoon instead
**If you feel like 3 types of berries is too many then sacrifice the blackberries


Red Wine Smoothie recipe | www.songofspiceandfire.com


Monday, May 13, 2013

Khalee-C-Cupcakes: Heart-Shaped Red Velvet Cake

Caramel Flavored Red Velvet Cupcakes with a Peppermint Garnish


As we watched Daenerys Targaryan muscle her way past the gag reflex and choke down a raw horse heart during the first season of Game of Thrones, we thought to ourselves, "OMG, cupcakes!!" Yes, you read that correctly: cupcakes. Not just any cupcakes, mind you, but red velvet cupcakes with delicious whipped cream frosting and peppermint pieces all in a sweet little heart shape--a nod to Daenerys' suffering. 

Unfortunately, one amongst our number isn't such a fan of red velvet cake and handles eating cupcakes made with it about like Daenarys handled the horse heart...


If you're still with us--which you should be, because these bad boys are tasty--then let's get to baking!

Ingredients:


 Red velvet cupcakes (recipe here
 6 ounces of caramel ice cream topping
14 ounce can of sweetened condensed milk
1 cup heavy whipping cream
 1 tsp vanilla extract
 1 tbsp confectioner's sugar
 red food coloring
 peppermint candies


Step 1: Start out by prepping your favorite red velvet cupcake recipe. Here’s a good one from drool factor, but if
Khalee-C-Cupcakes
you’re more comfortable making it from the box than from scratch, that’s fine too. 

Step 2: I’m using a Wilton heart-shaped cupcake pan. If you don’t have or want to buy a heart-shaped pan, you can either make regular round cupcakes, or there are a couple of simple tricks you can follow to get heart-shaped cupcakes.

  •        One is the place a marble between the cupcake filter and the inside of the pan. This created the top of the heart.
  •         The second option is to bake your cake batter in a large flat pan and either cut out the heart shapes or use a cookie cutter.

Step 3: Use whichever shaping method you’ve chosen above and bake your cupcakes.

Step 4: While the cupcakes are in the oven, it’s time to prep the caramel and sweetened-condensed milk.  Combine the milk and caramel in a saucepan and stir. The mixture should be warm and easy to pour. Don't let the mixture become too hot and burn the caramel and milk.

Step 5: When the cupcakes are done let them cool for five minutes. Then take a knife and cut slits in the top of the cupcakes. Make sure not to cut to the bottom.

Step 6: Slowly pour the caramel and milk mixture over the slits in the cupcakes. I like to use a big spoon for this, but make sure not to pour too quickly. You want the cake to absorb the mixture.

Step 7: Prep the whip topping.
  •           Pour 1 cup of heavy whipping cream into a bowl. Mix until soft peaks form.
  •           Add 1 tsp of vanilla extract, 1 tbsp of confectioner’s sugar, and a few drops of red food coloring
  •          Beat until soft peaks form

Step 8: Put the whip topping on the cupcakes. To get a great look, put the topping into a piping bag and use a star-tip. I used a 1M star tip (which is quite large) to get a good icing look.

Step 9: Crush peppermints. This is easiest if you put the mints into a Ziploc bag and use a rolling pin to crush them. Once crushed, garnish the top of the cupcakes with the peppermints. Don’t like peppermint? Any chocolate or hard-candy will work and will add a great flavor.
Crushed peppermints sprinkled on the cupcakes
| www.songofspiceandfire.com
The sweet red velvet cupcakes with sprinkles of peppermint all around 
...take a bite and enjoy!