Showing posts with label easy. Show all posts

Friday, April 18, 2014

Dragon Treat S'Mores Bars

Chocolate Chip Cookie S'Mores Bars for Your Dragon

If you're anything like we are, you've been killing yourself trying to think of a good treat for you and your dragon to share. Well look no more. You won't need a fire to toast these s'mores, but you will love the melted marshmallows, chocolate chips. and graham cracker crust. 

This original recipe uses chocolate chip cookie dough without brown sugar to create a s'mores cookie bar that even your dragon will want to keep eating. Our dragon loved it! Not to mention that this dessert is easy to make and takes no time at all. Who said you need fire to make a good fireside snack?


Prep time: 15 minutes
Bake time: 25-30 minutes
Makes a 9x13 pan or s'mores bars

Ingredients:

1 cup (2 sticks) softened butter
3/4 cup sugar
2 eggs
2 tsp vanilla extract
2 1/2 cups all-purpose flour
1 tsp baking soda
1/2 tsp salt
2 cups chocolate chips (I used mini chocolate chips)
1 bag (10oz) mini marshmallows
10 graham crackers
3 Tbsp melted butter


Step 1: Preheat oven to 350 degrees F. 

Step 2: In a large bowl, mix together the 1cup of softened butter and granulated sugar on medium speed. Add eggs and vanilla extract. Cream together.

Step 3: Stir together flour, baking soda, and salt in medium-sized bowl. Add dry goods to the large bowl and mix together thoroughly.

Step 4: Stir in chocolate chips completely. Add mini marshmallows and stir in. Make sure they are completely stirred through the dough.

Step 5: Using a food processor, crush the graham crackers. You can also do this is by putting them in a plastic bag and crushing the crackers with a rolling pin. Pour the graham crackers into a small bowl. Stir in 3 Tbsp melted butter. Using a spoon or your fingers, press the graham crackers mixture into the bottom of a 9x13 pan. Make sure the crust is evenly spread across the bottom.

Step 6: Spread the dough over the graham cracker crust in the pan. Bake at 350 degrees for 25-30 minutes or until the top of the marshmallows is beginning to brown. Test with a toothpick to make sure that it is cooked through completely.

Trust me, these cookie bars are delicious. The graham cracker crust and marshmallows add something extra to a cookie bar that will leave your mouth watering. Not to mention, your dragon's mouth.

Enjoy!


Friday, April 11, 2014

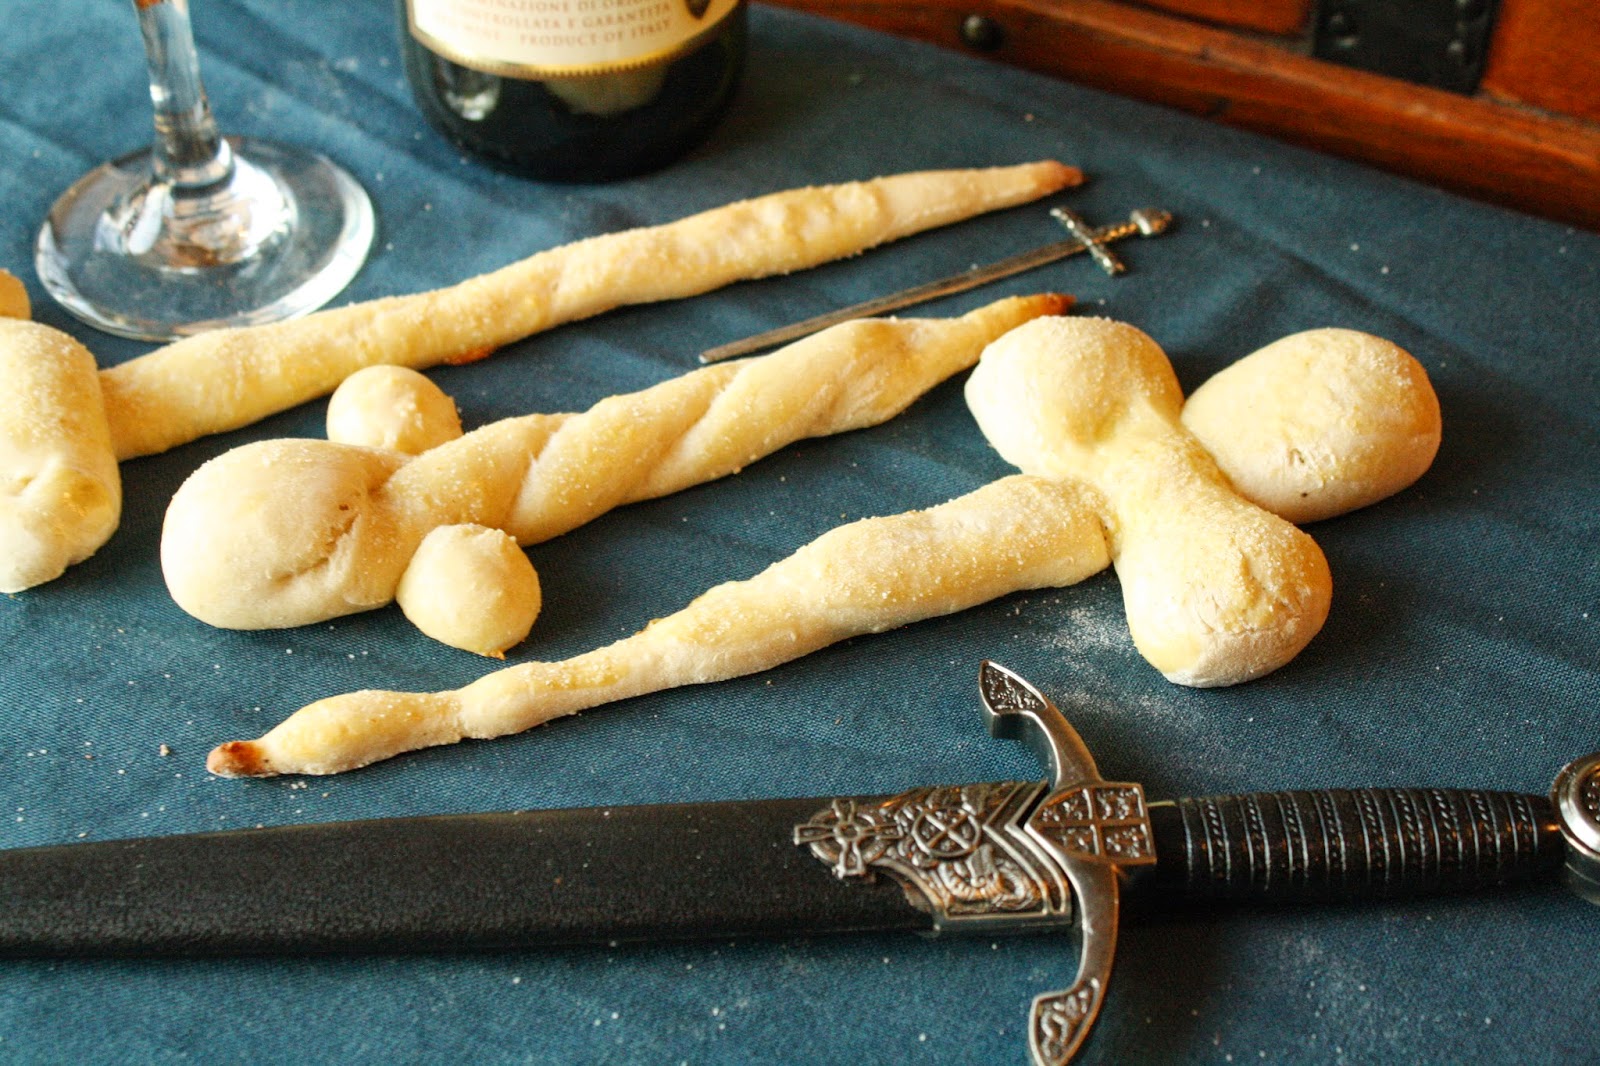
Pretzswords: Soft Pretzel Swords

Soft Pretzel Swords for Your Food Arsenal


Everyone needs a few armaments round the table. So why not make them delicious as well? The characters of Westeros seem to always be heavily armed - even at dinner. Here at House Cook, our arsenal is equipped a little differently. Sure, we have a couple of broad swords lying around, but when it comes to food our swords are completely edible.

If you love soft pretzels, then follow our recipe and shape them into pointed swords and knives that will make you ready for battle...or maybe just snack time. Whether you're fighting or eating, we recommend you always have a pretzel on your side.
Prep time: 30 minutes
Bake time: 10 minutes
Makes 8-12 Pretzels (less or more depending on how big you make them)

Ingredients:

1 1/2 cups lukewarm water
1 packet active instant yeast, or 2 1/4 tsp
1 tsp salt
1 Tbsp sugar
3 3/4 - 4 1/4 cups flour
1 egg
Salt for flavor

Step 1: Preheat the oven to 425 degrees and prepare a baking sheet with parchment paper.

Step 2: Dissolve the yeast in the lukewarm water. Stir gently with a spoon for about one minute until mixed. Add salt and sugar and stir until thoroughly combined. One cup at a time, add in three cups of flour. Mix with a wooden spoon while you add until the dough is thick. Add flour a quarter cup at a time until it is no longer sticky. 

Step 3: Flour a flat surface. Place the dough on top and knead if for about three minutes. Shape into a ball. Separate the dough into sections for the pretzels. You can make each pretzel as big or small as you want.

Step 4: To shape the swords, we used two different techniques. The first is to roll the dough into a long rope. Fold the rope in half and twist it together. Shape the end into a point and add two clumps of dough at the thicker end for the hilt of your sword. The other technique is to roll the dough into a long rope. Flatten the rope and then pinch it together with two finger. Pull one end into a point. Now take a smaller piece of dough and make a hilt that is large at the ends and thin in the middle. Lay the hilt over the top of the sword. Place each sword on the parchment paper when it is complete.

Step 5: Beat the egg into a small bowl. With a brush or your fingertips, spread egg over the top of you pretzels. Sprinkle with salt. (I like to use garlic salt on my pretzels). Place pretzels in the oven for ten minutes or until the bottom is golden brown.

And that's it! An easy and quick pretzel recipe with a Game of Thrones twist. We hope enjoy this great treat for a regular snack or a Game of Thrones viewing party.


Monday, October 7, 2013

Winter is Coming: Apple Cider Cupcakes


Apple Cider Cupcakes with Cinnamon Buttercream Icing


Feel that chill in the air? Winter is coming. 

But for now, it's time to celebrate Fall. To help your taste buds adjust to the change in the weather, we've whipped up an easy dessert. Apple cider cupcakes, topped with cinnamon buttercream icing, are the perfect treat for autumn. These melt-in-your-mouth cupcakes will leave your house smelling like cinnamon. Not to mention that they match the colors outside.


Prep time: 30 minutes
Bake time: 19-22 minutes
Makes: about 15 cupcakes

Cupcake Ingredients:

2 eggs
1 2/3 c flour
2/3 c sugar
1 c apple cider (I made mine with instant apple cider mix)
1/2 softened butter
2 tsp baking powder
1 tsp cinnamon
1/2 tsp salt
1 tsp vanilla

Buttercream Ingredients:

1/2 c butter
1/2 c shortening
2 tsp vanilla
1 tbsp cinnamon
1 tbsp milk
1 bag of powdered sugar

Cupcakes:

Step 1: Preheat oven to 350 degrees. Prep cupcake tins with paper liners.

Step 2: Whisk together cupcake ingredients in a large bowl. Do not add cider while it's hot, or you'll cook the eggs.

Step 3: Fill cupcake liners about 2/3 of the way full. Bake for 19-22 minutes, or cooked through. Test with a toothpick.

Icing:

Step 1: Beat together butter, shortening, and vanilla until creamed. Stir in cinnamon.

Step 2: Beat in powdered sugar one cup at a time. When the mixture becomes thick, add 1 tbsp of milk and keep beating. Mix in the entire bag of powdered sugar. You will have extra icing. Either cut the recipe in half before you start, or store icing in the fridge.

To get the two-toned roses that I decorated my cupcakes with, divide your icing in half and color one half red and the other orange. Then follow the instruction here to create two-toned roses.

And that's it! A super easy recipe for fall. These cupcakes will definitely impress at any fall or Halloween party. Enjoy!


Friday, August 9, 2013

The Long Summer Caprese Bites

Tomato, Mozzarella, and Fresh Basil Bites with Balsalmic Vinegar

The Long Summer is finally drawing to a close, and that means that winter is coming. Hear at Cook's Landing, the long lunch seems to be winding up as well. And we all know what that means, dinner is coming. We're about to enter fall, or what we like to call "that awkward phase before dinner when you fill up on appetizers". 

So today we bring you Caprese Bites - the perfect, light appetizer for your pre-dinner treat.

You'll need:

Fresh basil leaves
Cherry tomatoes
Mozzarella cheese
Salt
Pepper
Balsamic vinegar
Toothpicks

Step 1: Cut the cheese into cubes. Put one cherry tomato, half a basil leaf, and one cube of cheese on each toothpick. I like to heat mine up in the oven so the cheese is warm. If you like it warm, preheat the oven to broil and place your bites on a pan. Let them sit in the oven for no longer than 1 minute so the cheese isn't too melted. 

Step 2: Sprinkle salt and pepper over your bites and then drizzle balsamic vinegar on top. I like to keep extra vinegar in a bowl with salt and pepper in it to dip the bites in.

And that's the whole process. An easy and delicious appetizer that anyone can make. Enjoy!


Tuesday, August 6, 2013

Kingsroad Peanut Butter Bars


Reese's Dark Chocolate Peanut Butter Cup Bars

We love Reese's. Naturally, while we watched Jamie Lannister slog through the mud of Kingsroad this past season, we thought: Reese's! So today we've whipped up a batch of Reese's Peanut Butter Cup Bars that are an easy treat for a hot day. And as dark chocolate fans, naturally we used ark chocolate chips. 

So today, when you're traveling down the Kingsroad in the heat, sit back and relax for a minute while you enjoy this simple dessert.

Prep time: 15 minutes
Fridge time: 2 hours
Makes: 9x13 pan

Ingredients:

1 1/2 c peanut butter
1 1/2 c powdered sugar
2/3 c crushed graham crackers
2 Tbsp butter

4 cups dark chocolate chips
4 Tsbp shortening

Step 1: Mix together peanut butter, sugar, graham crackers, and butter. Spread across the bottom of an ungreased 9x13 inch pan. 

Step 2: In a double boiler, melt chocolate chips and shortening together. Pour evenly over the peanut butter mix. Place in the refrigerator for 2 hours or until top is solid.

And that's it! Super simple and delicious. Cut it into bars and enjoy!


Thursday, August 1, 2013

Beyond the Wall Pizza


Cheese and Tomato Pizza with No Yeast Pizza Dough

We started our Beyond the Wall series with our fast and delicious 3 Ingredient Peanut Butter Cookies. Now we'd like to bring you a main course that's quick, easy, and will leave your mouth watering for more.

Here at Cook's Landing we love pizza. Over the years we've perfected that love into a recipe with piles of tomatoes and four kinds of cheese. Of course our impatience to eat the pizza means we don't like waiting for yeast to rise. So instead we use this simple no yeast recipe.

No Yeast Pizza Dough...

Prep time: 15 minutes
Bake time: 20-25 minutes
Makes 2 pizza bases

Ingredients:

2 c flour
2 tsp baking powder
1 tsp salt
2/3 c milk
1/4 olive oil
2 Tbsp olive oil - to brush on dough

Step 1: Preheat oven to 425 degrees. Stir together ingredients (except 2 Tbsp of olive oil) in a large bowl. In the bowl, gather the dough together and press it into a large ball.

Step 2: Knead dough in the bowl until smooth. Split ball in two and place on a lightly floured surface. Roll each half into a roughly 13 inch circle. Place on pizza pan. Turn up the edge and pinch into 1/2 inch ridges to finish your crust. Brush the 2 Tbsp olive over the surface of the dough.

How to decorate the pizza...

You'll need:

Pizza sauce
1 can of dice tomatoes
Italian Seasoning
Crushed Red Pepper
Garlic Powder
Onion Powder
Crumbled feta cheese
2 roma tomatoes
Romano cheese
Provolone cheese
Parmesan cheese

Step 1: Spread a thin layer of pizza sauce over the surface of the dough. With a spoon, scoop out diced tomatoes from the can and cover the surface of the pizza dough, placing a tomato chunk on every 1/2 inch of the dough.

Step 2: Lightly sprinkle Italian seasoning, crushed red pepper, garlic powder, and onion powder over the surface of the pizza. Sprinkle feta cheese crumbles over the entire pizza.

Step 3: Slice roma tomato into thin slices and place evenly over the surface of the pizza. Grate the remaining three cheeses and sprinkle over the pizza until the roma tomatoes are only slightly visible beneath. Don't put too much cheese - unless you're a huge cheese fan, and then have fun!

Step 4: Bake for 20-25 minutes or until the pizza looks done (slightly brown on top).

And that's it! A pizza with so much flavor, it'll melt in your mouth. This cheesy tomato pizza will leave you wishing you'd made more.


Friday, July 26, 2013

Dragon's Sweet Teeth: Blueberry Lemonade Popsicles

This Friday isn't a drink (sorry to say, because I'm thirsty). Today, the Hand of the Kitchen brings you a variation on last week's blueberry lemonade: blueberry lemonade popsicles!


Our hand of the kitchen loves to freeze juices into popsicles during the summer and the lemonade last week was no exception. To make the popsicles extra tasty, though, we've mixed a special batch of lemonade with a little less water so the flavor is nice and juicy.


Fresh Blueberry Lemonade Popsicles

Ingredients

3/4 c hot water
3/4 c sugar
1 c fresh lemon juice
1 c fresh blueberries
2 c cold water 
1 popsicle tray

Step 1: Puree together your hot water, sugar, lemon juice, and blueberries until everything is thoroughly mixed. 

Step 2: Pour your mixture into a pitcher through a fine mesh strainer 

Step 3: Stir in your cold water and pour your juice mixture into popsicle trays, add sticks, and freeze. 

These popsicles are so delicious! 


Monday, July 22, 2013

A Treat for Queens: Crepes

Strawberry and Banana Crepes for the Highborn in Us All


Here at Cook's Landing we appreciate a treat for breakfast. And on those days when we want to feel as highborn as the queen herself, we like to make crepes. We fill ours with fresh strawberries and bananas and drizzle melted milk chocolate over the top. Sometimes, when we're feeling extra decadent, we even add a little whip cream to the top.

So today we'd like to share with you our crepes. They're easy and delicious. Trust us. We won't steer you wrong. Especially when it comes to crepes. 

Prep time: 10 minutes
Cook time: 20 minutes
Makes 8 crepes

Ingredients:

1 c flour
2 eggs
1/2 c milk
1/2 c water
1/4 tsp salt
2 Tbsp melted butter

Step 1: Whisk together flour and eggs. Slowly add in milk and water. Thoroughly beat in melted butter and salt.

Step 2: Heat a lightly greased frying pan on medium high heat. Pour batter into the frying pan. Use about 1/4 cup of batter per crepe. To evenly spread the batter, tilt the pan in a circular motion so that the batter spreads. Do this immediately, before the batter has time to heat. Cook each crepe for about 2 minutes. Flip when the bottom starts to brown - you'll be able to tell if it's browning by watching the edges. To flip, slide a spatula under the crepe and loosen the entire thing before quickly flipping it over.

We chose to fill our crepes with fresh cut bananas and strawberries. Then we took melted milk chocolate and drizzled it over the crepes. To get a perfect drizzle, put the chocolate in a plastic bag and cut off a very small piece of the corner. Then squeeze the chocolate out of the corner of the bag and over the crepes.


Friday, July 19, 2013

Fresh Blueberries for Blueberry Lemonade

Although House Cook is located firmly in suburbia, this area near Atlanta is a bit odd. It grew so fast that in some ways the landscape never had time to catch up. Down the street from House Cook is a tangle of trees that hides a fantastic blueberry patch. Many of our neighbors like to tromp into the woods and pick fresh blueberries, and a few days ago we joined them.

Grabbing tupperware and boots, we trooped out into the undergrowth to hunt for delicious, ripe berries.

It was fantastic! Many of the bushes still had berries that weren't yet ripe, but we found plenty that were.

Looking for something delicious to do with the berries besides just gobble them all up before getting home, we've decided to bring you fresh blueberry lemonade.


 Fresh Blueberry Lemonade Recipe

Ingredients

3/4 c hot water
3/4 c sugar
1 c fresh lemon juice
1 c fresh blueberries
4 c cold water (or sparkling water)

Step 1: Puree together your hot water, sugar, lemon juice, and blueberries until everything is thoroughly mixed. 

Step 2: Pour your mixture into a pitcher through a fine mesh strainer (unless, of course, you like the pulp in which case just dump it all in). 

Step 3: Stir in your cold or sparkling water, serve over ice and enjoy! 


Monday, July 15, 2013

Beyond the Wall: 3 Ingredient Peanut Butter Cookies


Today we bring you the first recipe in our Beyond the Wall series. We'll be giving you easy-to-make recipes that our fast, no-bake, or low-ingredient. All things that will help you survive in the freezing tundra north of the Wall.

The first of these are our super simple, 3 ingredient peanut butter cookies. The youngest of our troop, and our hand of the kitchen, found herself north of the wall with our dire wolf and in desperate need of food. Luckily she remembered this recipe and was able to whip together something to nibble on. And our dire wolf loves peanut butter. If she hadn't baked these cookies, who knows what would have happened to them...


Prep Time: 5 minutes
Bake Time: 7-10 minutes
Makes: 30 cookies

Ingredients:

1 c peanut butter
1 c granulated sugar
1 egg

Step 1: Preheat oven to 350 degrees. Prepare a baking sheet covered in parchment paper.

Step 2: In a medium sized bowl, thoroughly stir or mix together peanut butter, sugar, and egg. Drop teaspoon sized balls of dough on the parchment paper. Space cookies roughly one inch apart. Bake for 7-10 minutes, or until the bottoms of the cookies are browner than the original dough.

And that's it! Delicious peanut butter cookies with only 3 ingredients. Now keep safe. It's cold beyond the wall, and dessert is coming.


Look out for more Beyond the Wall recipes coming soon.


Monday, July 8, 2013

Dragon Droppings: Where Chocolate Chip Cookies REALLY Come From

Dragon Poo Chocolate Chip Cookies: delicious, gooey, good

Even delicious comfort food can come from the strangest of places...


Sure, dragon's spend most of their time burning things and looking menacing, but even they have to do their business at least once a day to maintain healthy dragon colons.

Whether your a wildling or a high-born, dragon droppings, when baked at 350 degrees, make an extremely delicious comfort food or dessert snack that's known to the locals as Chocolate Chip Cookies.

We've got a recipe for you to match all others and will be a sure-fire win at any Cook's Landing bake sale. So, let's bake us some dragon poo!


Dragon Poo Chocolate Chip Cookies Recipe

Makes roughly 24-28 cookies 

Ingredients

1/2 c shortening (or canola oil)*
6 tbsp white sugar 
6 tbsp brown sugar
1 egg
1/2 tsp vanilla extract
1 c and 2 tbsp flour
1/2 tsp salt
1/2 tsp baking soda
1/3 c semi sweet chocolate chips**

*We prefer Crisco, but canola oil also works if you're low on shortening, but it's soupier and bakes darker

**We've grown up on semi-sweet and haven't ever tried anything else, but chocolate chips all taste the same once they're in cookie form).

Step 1: Preheat oven to 350 degrees. Cream together your shortening (or canola oil) - microwave the
shortening for 10 seconds on medium power level or less to make it softer - white sugar, and brown sugar

Step 2: Once that's got a good creamy texture, mix in your egg and vanilla extract. Then mix in your flour, salt, and baking soda.

Step 3: Now comes chocolate chip time! Our recipe recommends 1/3 cup, but if you've got a clan like ours, cut open the bag and pour in chips until there's a 6 chips per 1 T. of dough ratio. At least. 

Step 4: Drop dough on an ungreased cookie sheet, spacing about 2 inches apart in about 1 tbsp dollops  If you used canola oil, you're probably gonna have to scoop and drop with a spoon, but if you used shortening then you can easily roll the dough into balls with your hands.

Step 5: Bake at 350 for 8-10 minutes or until golden brown. If you see the bottoms getting darker than the dough then they're done.

Set on a rack to cool or let them sit on the pans 'til you start seeing that they are mysteriously disappearing.

Enjoy the deliciousness! The Sisters of House Cook recommend a nice glass, or mug, of milk for optimal dipping, to accent the chewy cookies.

Delicious Chocolate Chip Cookies: the gooiest you'll ever enjoy | www.SongofSpiceandFire.com

Thursday, June 27, 2013

Targaryen Tacos: spicy food for people who can't catch on fire


So, you've been looking for a way to spice up your life and have the added benefit of being a person who doesn't get burned in fire. Awesome. You're just like our fave, Daenerys Targaryen, who sat in fire with her dragon eggs and come morning in the smoldering fire... behold! Dragons babies! Totally-unharmed-skinny-blonde-girl! Not getting burned in fire is a great skill to have. It opens up a whole world of foods to you...but we're not going to get too crazy. Today, we bring you delicious Targaryen Tacos.


Prep time: 10 minutes
Cook time: 20 minutes
Serves: 5-10 people

Ingredients:

1 pound ground beef
1/2 yellow bell pepper
1/2 green bell pepper
1/2 medium sized jalapeno pepper
1 roma tomato
30 cilantro leaves
1/2 cup water
2 tbsp chili powder
1 tsp garlic salt
1/2 tsp ground red pepper
1 tsp onion powder
Dash of salt
Juice from 1 fresh lime

Preparing the Taco Meat...


Step 1: Slice half of each of the bell peppers into thin strips and place a medium size bowl. Finely chop the half jalapeno and place in bowl. Chop roma tomato and add it to the bowl. Very finely chop the cilantro leaves and add them as well.

Step 2: Place ground beef in a skillet and put it on the stove. With the heat on high, use a wooden spoon to break up the meat. Continue to break and stir the beef until it is completely browned. When it's browned thoroughly, remove the grease with a strainer.

Step 3: Pour water over the beef and stir in chili powder, garlic salt, ground red pepper, onion powder, and salt. Add the vegetables and stir in well. Continue stirring for 3-4 minutes. Squeeze the juice of one lime over the beef and stir in. Allow the meat to simmer on low heat for 5 minutes. Remove from heat and serve immediately.


I like my tacos with freshly chopped roma tomatoes, grated mozzarella cheese, and salsa. Dress your taco however you like, but I guarantee you'll love the beef.

If you like guacamole with your tacos, try our unbeatable guac recipe.